
17 Simple DIY Backyard Patio Ideas That Transform Your Outdoor Space
A backyard without a patio is like a living room without furniture — technically a room but missing everything that makes it worth spending time in. Across the USA, millions of homeowners are discovering that building a simple DIY backyard patio doesn’t require a contractor, a massive budget, or professional construction skills. It requires a weekend, a plan, the right materials, and the confidence to start. Whether your backyard is a sprawling suburban lawn or a tight urban rectangle behind a rental townhouse, a thoughtfully built patio transforms it from unused grass into a genuine outdoor living space you’ll actually use every single day. This guide covers every material, technique, style, and budget approach you need to make it happen — from the very first shovel in the ground to the final string light strung overhead.
H1: Simple DIY Backyard Patio Ideas That Transform Your Outdoor Space
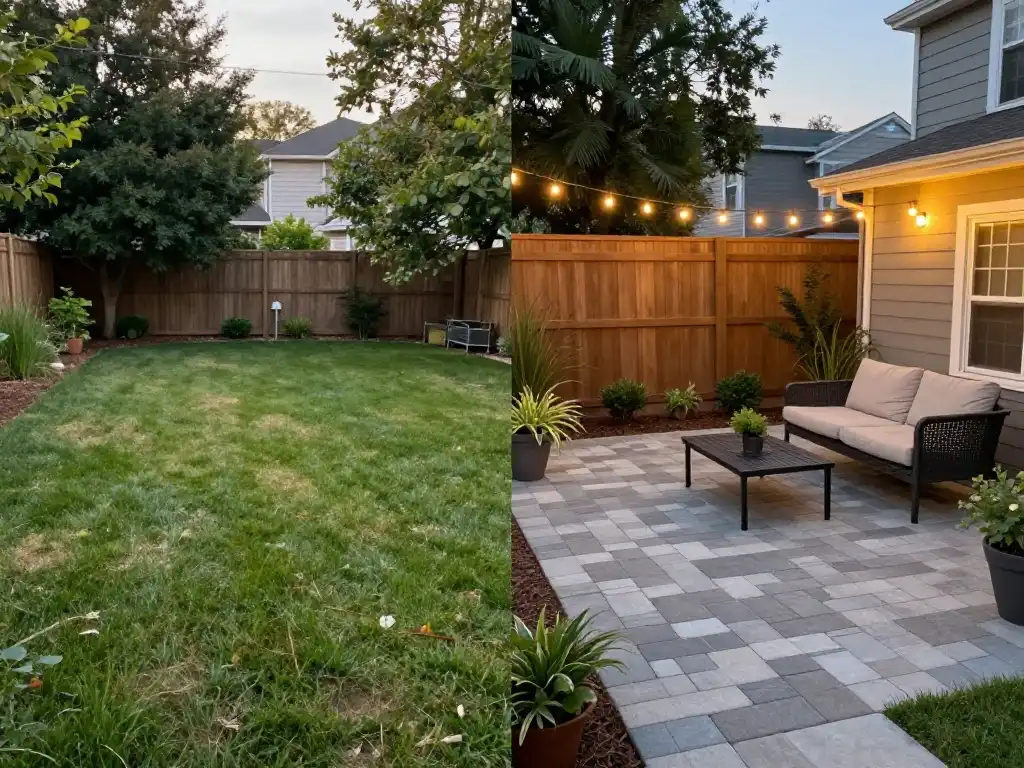
The best outdoor spaces don’t happen by accident. They happen when a homeowner decides — once and for all — that the backyard deserves as much design thought as any room inside the house. A simple DIY backyard patio is the foundation of that decision. It creates a defined zone for living, dining, relaxing, and gathering outdoors. It gives furniture a purpose and a place. It turns an empty lawn into something genuinely functional. And when done well, it adds real monetary value to the property — Remodeling Magazine’s Cost vs Value Report consistently lists outdoor living improvements among the highest-return home upgrades available to American homeowners.
The best part? You don’t need to spend $15,000 on a hardscape contractor to achieve something extraordinary. A simple DIY backyard patio design built from concrete pavers, gravel, flagstone, or pressure-treated wood can look genuinely professional when the groundwork is done correctly and the layout is planned thoughtfully. The difference between a DIY patio that looks impressive and one that looks amateurish usually comes down to preparation — specifically, how well the ground was leveled, how carefully the materials were chosen, and how consistently the installation was executed. This guide walks through every step of that process so your finished patio looks like it belongs on a design blog — not a cautionary tale.
Why Every Backyard Needs a Simple DIY Patio
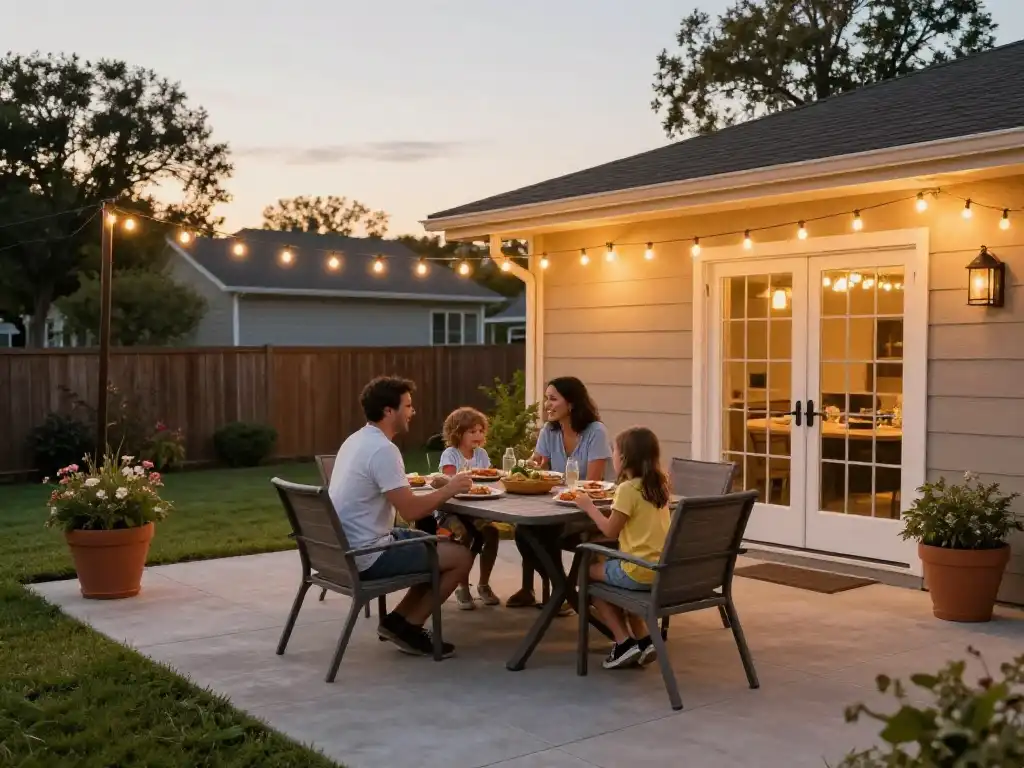
Outdoor living isn’t a luxury in the American home — it’s an expectation. According to the American Institute of Architects, outdoor living spaces have ranked among the most requested home features by American homeowners for over a decade running. A simple DIY backyard patio delivers on that expectation without the timeline or cost of a professional installation. It creates a dedicated space for morning coffee, weekend barbecues, evening dinners, and quiet afternoons with a book — the kinds of moments that make home ownership genuinely worthwhile rather than just financially significant.
Beyond lifestyle, the practical case is equally compelling. A well-built patio reduces lawn maintenance by replacing a section of grass that needs mowing, watering, and fertilizing with a hard surface that needs nothing more than an occasional sweep. It controls foot traffic patterns and prevents the muddy patches that develop near back doors and outdoor seating areas. And it defines the outdoor space architecturally — giving furniture a logical home, creating clear sightlines from inside the house, and establishing a visual anchor for any landscaping planted around it. A simple DIY backyard patio weekend project pays dividends every single day it exists.
Best Materials for a Simple DIY Backyard Patio
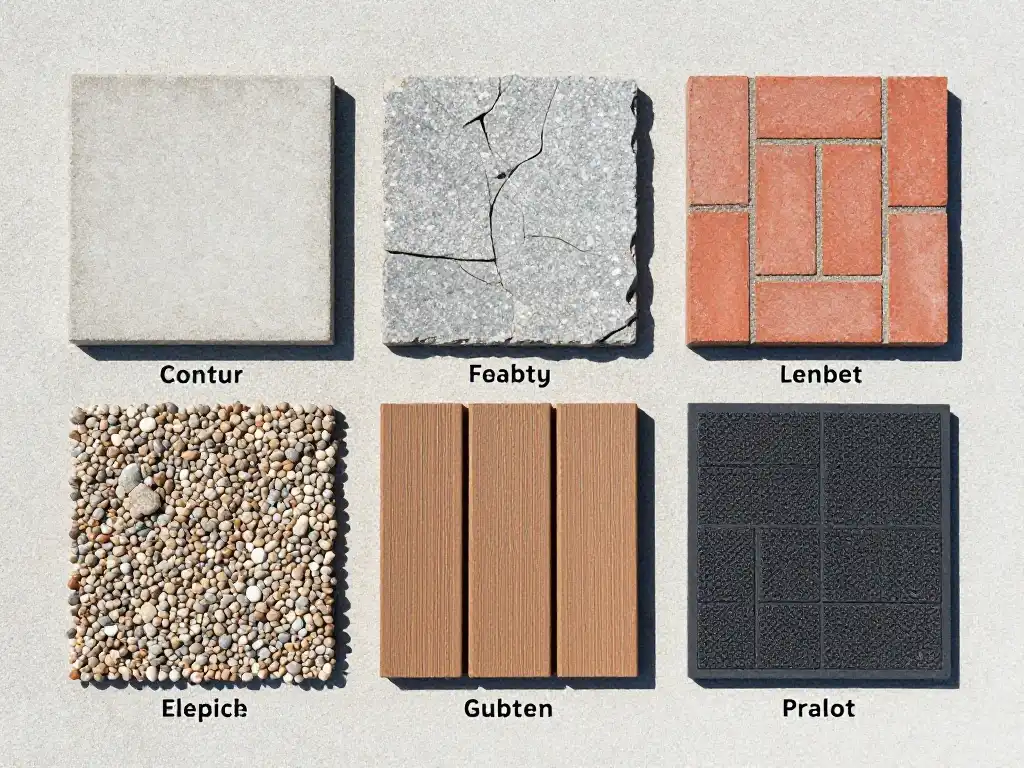
Material choice sets the entire character of a patio — its look, its feel underfoot, its maintenance requirements, and its long-term durability. Best materials for simple DIY backyard patio projects fall into five broad categories, each with distinct advantages depending on budget, skill level, and aesthetic preference. Concrete pavers from brands like Belgard and Unilock offer the best combination of durability, design versatility, and DIY-friendliness. They’re uniform in size, easy to lay on a prepared sand base, and available in dozens of colors and textures that replicate the look of natural stone at a fraction of the cost.
Flagstone brings natural irregularity and a timeless organic character that no manufactured paver can fully replicate. Gravel and crushed granite offer the most budget-friendly option and install faster than any solid-surface alternative — though they require edging to stay contained and can shift underfoot over time. Pressure-treated wood and composite decking suit raised platform applications beautifully and work particularly well in backyards with significant slope. Simple DIY backyard patio with rubber tiles deserves special mention for renters and apartment dwellers — interlocking rubber or foam tiles install without any ground preparation, require no tools, and lift cleanly when you move out without damaging the underlying surface.
| Material | Cost Per Sq Ft | Difficulty Level | Lifespan | Best For |
|---|---|---|---|---|
| Concrete pavers | $3–$8 | Beginner–Intermediate | 25–50 years | Most backyards |
| Flagstone | $5–$12 | Intermediate | 30+ years | Natural aesthetic |
| Gravel / pea gravel | $1–$3 | Beginner | 5–10 years | Budget builds |
| Pressure treated wood | $8–$15 | Intermediate | 15–25 years | Raised platforms |
| Rubber / foam tiles | $2–$5 | Beginner | 5–10 years | Renters, apartments |
| Brick pavers | $4–$10 | Intermediate | 25+ years | Classic cottage style |
Tools You Need Before Starting Your DIY Backyard Patio
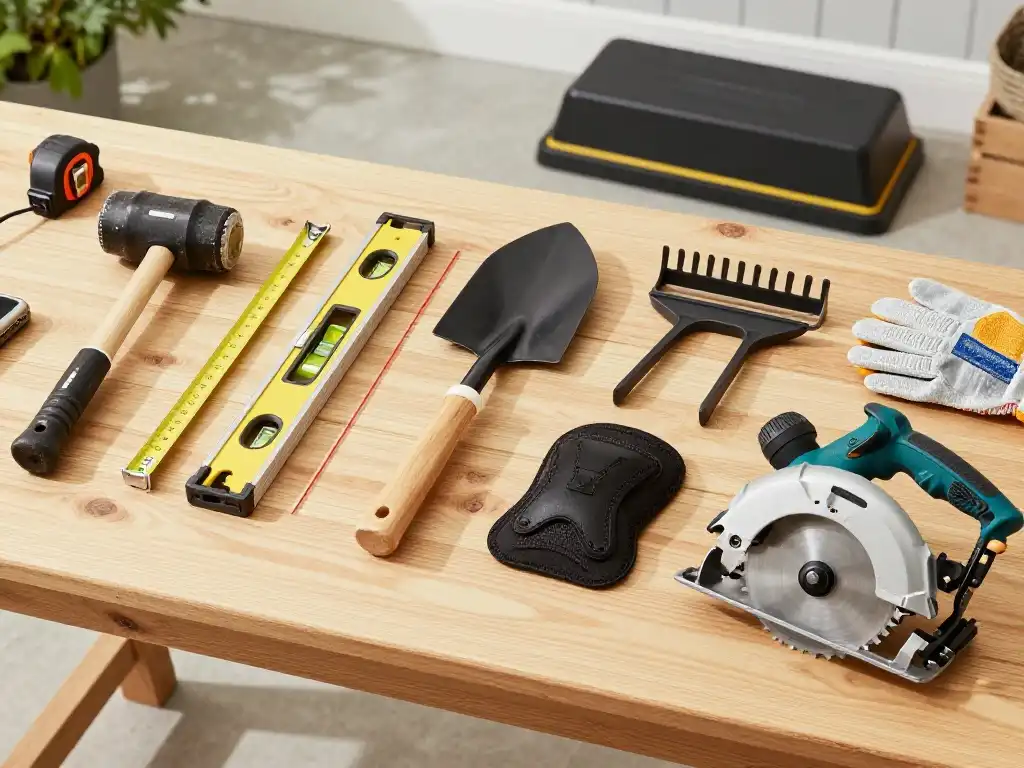
The right tools make a DIY patio build exponentially easier — and the wrong tools (or missing ones) turn a manageable weekend project into a frustrating multi-week ordeal. Simple DIY backyard patio tools and materials shopping should happen before a single mark is made in the yard. The essential toolkit for a standard paver or flagstone patio includes: a tape measure for accurate layout, a chalk line for straight edges, a level tool for checking grade, a shovel and spade for excavation, a landscape rake for smoothing the base, a rubber mallet for seating pavers, a wheelbarrow for moving materials, and knee pads for the inevitable hours of close-to-ground work.
you may also like this: 15 Reading Nook Garden Ideas: How to Create the Most Magical Outdoor Reading Space You Will Never Want to Leave
For larger patios or any project involving significant ground leveling, renting a plate compactor from Home Depot or Lowe’s tool rental is strongly recommended. A plate compactor compresses the gravel base to a density that hand-tamping simply cannot match — and a properly compacted base is what prevents pavers from shifting, sinking, or developing uneven spots over time. A circular saw with a masonry blade handles any paver or flagstone cutting required around curves, steps, or irregular edges. Invest in quality safety gloves — concrete pavers are heavy and sharp-edged and the cost of a good pair of gloves is considerably less than an urgent care visit.
How to Plan and Measure Your Backyard Patio Space
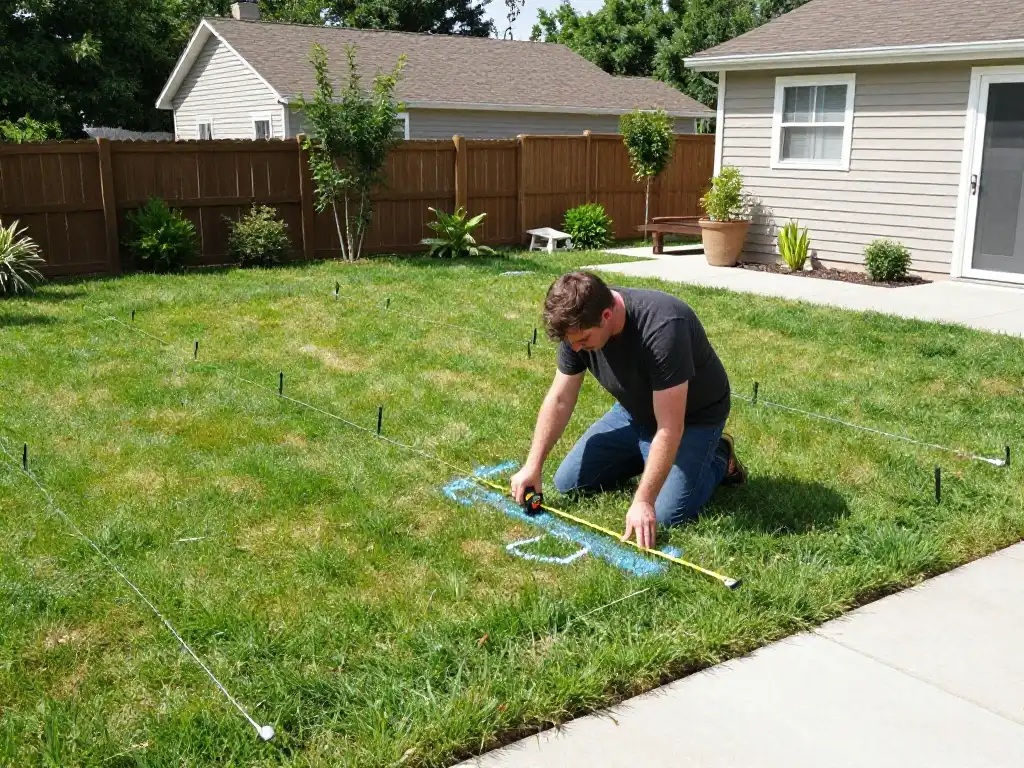
Planning is the most undervalued phase of any DIY patio project. Homeowners who skip straight to material purchasing almost always end up either 20% short on materials or 30% over budget because the quantities weren’t calculated accurately from a proper scale plan. Start by marking out the desired patio footprint with spray paint or garden stakes and string — walk the space, sit in it mentally, imagine furniture placement, and adjust the boundaries before committing to any excavation. Standard patio size recommendations for a seating area with a four-person table run 12 feet by 14 feet minimum — smaller than that and chairs constantly bump into the patio edge.
Simple DIY backyard patio design planning also requires thinking about drainage from day one. Every patio surface needs a slight slope — typically 1/8 inch per linear foot — directing water away from the house foundation and toward the yard or a designated drainage channel. Fail to plan this slope and you’ll have a patio that pools water after every rainstorm. Use a long level and measuring tape to check the natural grade of your backyard before excavating. If the yard slopes toward the house, you’ll need to build in a more aggressive drainage solution — either a French drain alongside the patio edge or a slight crown in the patio surface that sheds water to both sides.
How to Level and Prepare the Ground for Your Patio
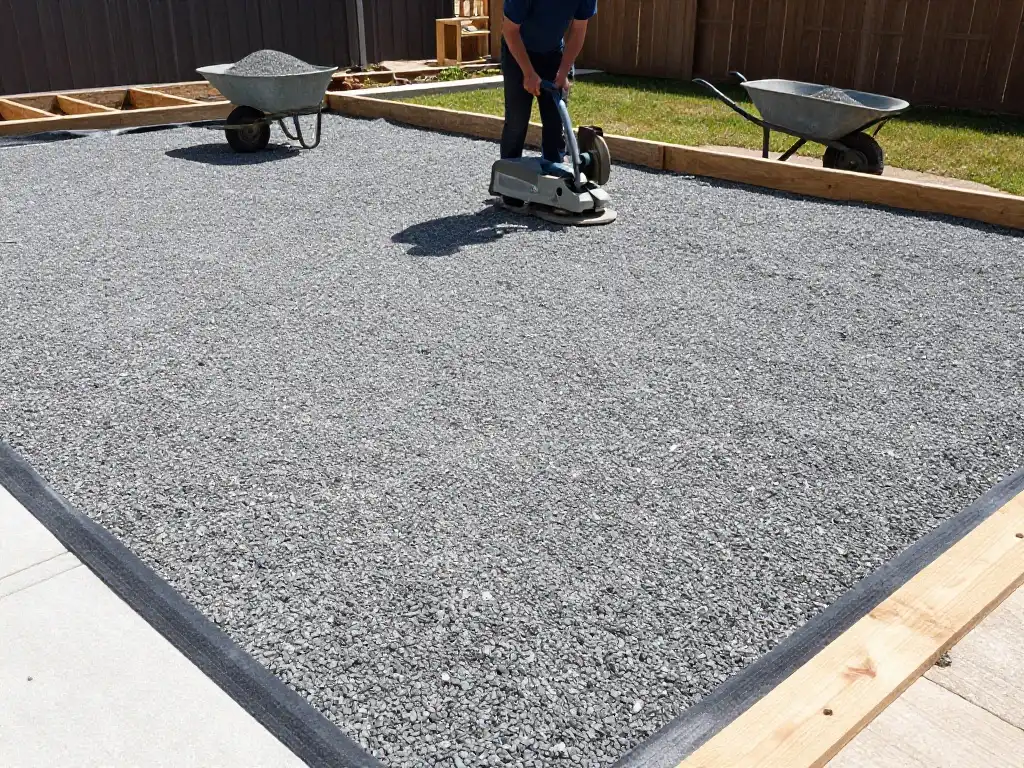
Ground preparation is where DIY patios succeed or fail. Simple DIY backyard patio leveling ground work determines whether the finished surface looks professional or perpetually uneven. Excavate the patio footprint to a depth of 6–8 inches below the desired finished surface level — this accommodates a 4-inch compacted gravel base, a 1-inch sand bedding layer, and the paver or stone thickness above. Remove all grass, roots, and organic material from the excavated area completely. Any organic material left in the base will decompose over time and cause the patio surface above to sink and shift.
Once excavated, install landscape fabric across the entire base before adding gravel — this suppresses weed growth through the patio joints for years without inhibiting drainage. Add 4 inches of crushed gravel (3/4-inch angular crushed stone compacts best) and compact it thoroughly with the plate compactor in two separate 2-inch lifts. Simple DIY backyard patio drainage tips emphasize the importance of checking slope direction after compaction — re-check your 1/8-inch-per-foot drainage slope at this stage, before adding the sand layer, because correcting it after the sand is down is far more difficult. Finish with a 1-inch layer of coarse concrete sand screeded smooth with a long board or screed rail for the perfectly level bedding surface your pavers will rest on.
Simple DIY Backyard Patio With Pavers Step by Step
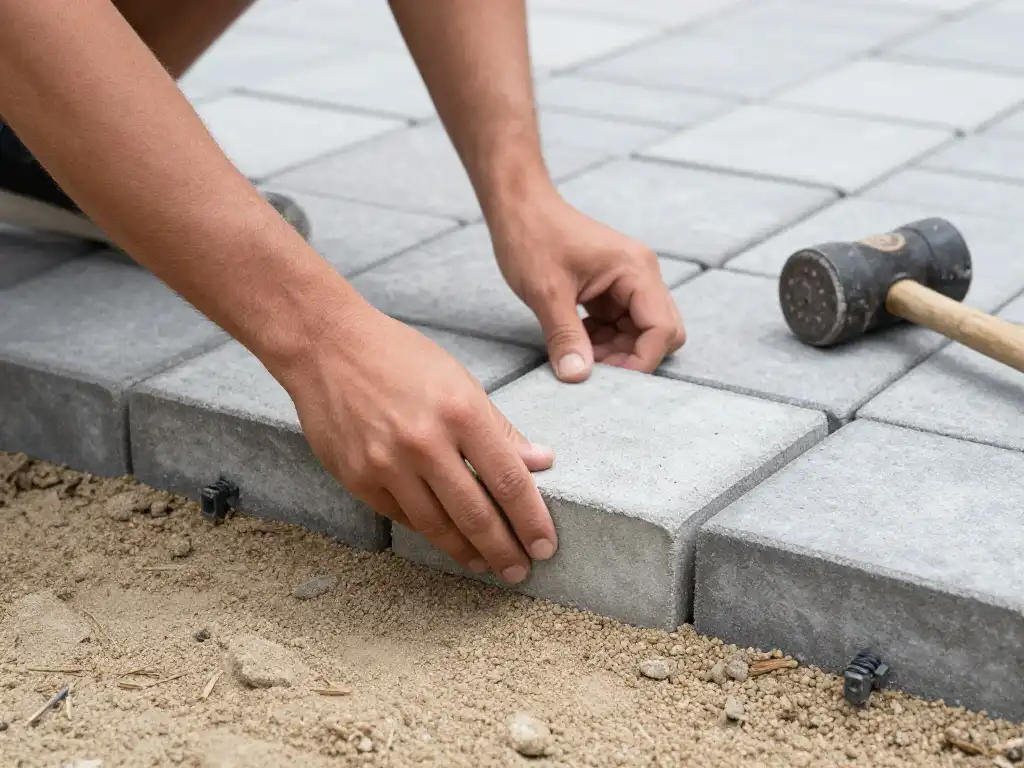
Paver patios are the most popular simple DIY backyard patio project in the USA for one very good reason — they’re genuinely forgiving. Unlike poured concrete, individual pavers can be lifted, adjusted, and relaid if something looks wrong. The simple DIY backyard patio step by step process for a paver installation begins after the compacted gravel base and screeded sand layer are complete. Start laying pavers from the most visible corner of the patio — typically the corner closest to the house back door — and work outward in a consistent pattern. Use polymeric sand in the joints rather than regular sand — it hardens when wet and locks pavers together while still allowing minimal movement that prevents cracking.
Simple DIY backyard patio with pavers installation requires maintaining consistent joint spacing — typically 1/8 to 1/4 inch — throughout the entire installation. Use plastic paver spacers or a consistent piece of scrap wood to maintain this spacing as you work. Tap each paver firmly into the sand bed with the rubber mallet — a few firm taps, checking level after each — and ensure no paver rocks on its bedding before moving to the next. Once all pavers are laid, run the plate compactor over the entire finished surface (with a rubber pad attachment to protect the paver faces) to fully seat them into the sand bed. Sweep polymeric sand into all joints, mist with water to activate the binding agents, and allow 24 hours to cure before walking on the surface.
Simple DIY Backyard Patio With Gravel and Flagstone
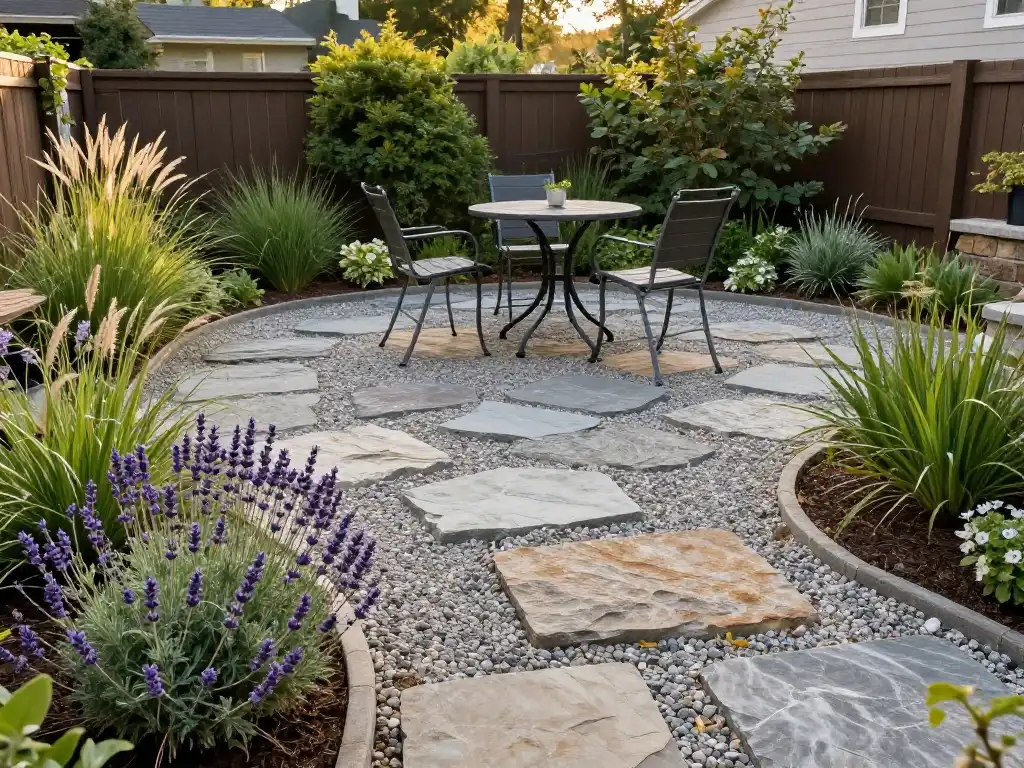
Gravel and flagstone together create one of the most naturally beautiful and budget-accessible patio combinations available. Simple DIY backyard patio with gravel installation is genuinely the fastest patio build possible — excavate 3–4 inches, lay landscape fabric, install timber or steel edging to contain the gravel, and fill to the top with pea gravel or crushed granite. The entire process can realistically be completed in a single day for a standard 12-by-14-foot patio. The resulting surface has excellent drainage, a soft natural crunch underfoot, and a casual garden aesthetic that suits cottage, farmhouse, and boho outdoor styles beautifully.
Simple DIY backyard patio with flagstone set in a gravel bed elevates this approach dramatically. Select flagstones in a range of sizes — large anchor stones for the primary stepping areas, smaller stones to fill the gaps — and bed them directly into a compacted sand and gravel base. The irregular natural edges of flagstone create organic joints that get filled with pea gravel, creeping thyme, or polymeric sand depending on your aesthetic preference. Creeping thyme between flagstone joints is particularly stunning — it releases a gentle herbal fragrance when walked on and fills in gaps with soft purple blooms in summer. Simple DIY backyard patio with stones of this kind looks like it took a professional landscape designer a week to create but a committed DIYer can realistically complete it in a single weekend.
Simple DIY Backyard Patio With Concrete and Brick
Poured concrete is the most permanent and the most durable patio surface available to DIYers — and while it requires more skill and physical effort than paver or gravel alternatives, the finished result is a surface that can last 30–50 years with minimal maintenance. Simple DIY backyard patio with concrete installation requires careful formwork construction — building a frame of 2-by-4 lumber around the patio perimeter that holds the concrete in shape while it cures. The base preparation is identical to a paver installation: 4 inches of compacted gravel, landscape fabric, and a smooth screed surface. Pour concrete to a minimum 4-inch depth and finish with a broom texture for slip resistance.
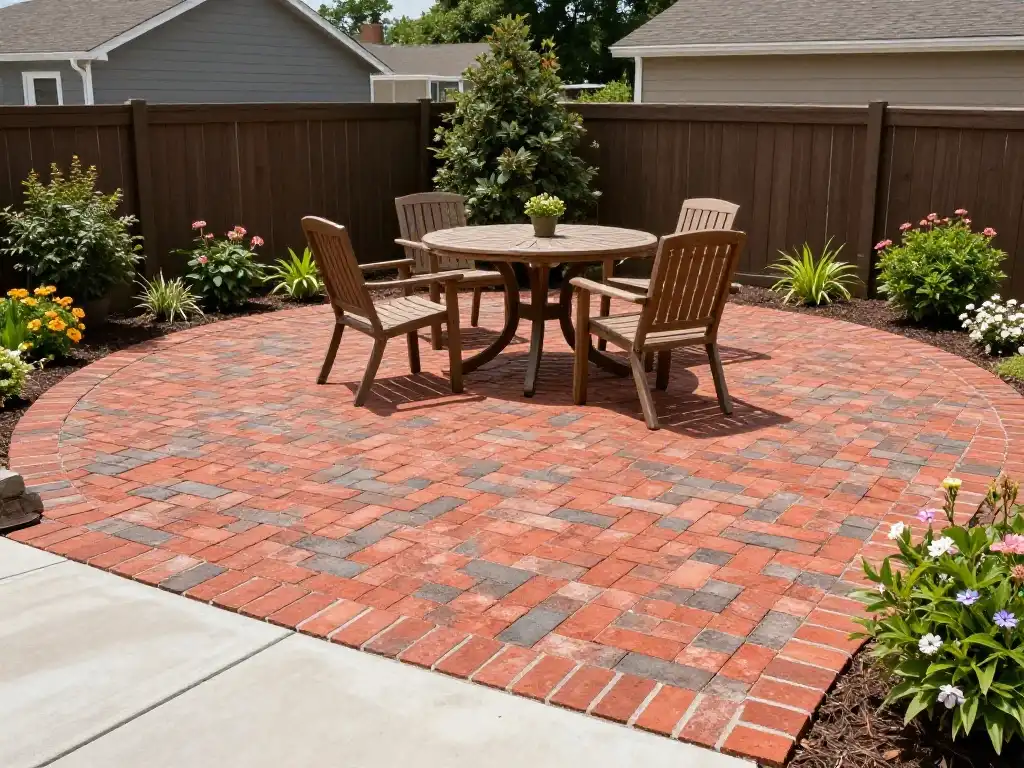
Simple DIY backyard patio with brick combines the permanence of mortared construction with the classic American aesthetic of traditional brick. Dry-laid brick — set in a sand bed without mortar in the joints — gives a more forgiving installation process that suits DIY skill levels well while still delivering excellent durability over time. Brick’s natural warm red-brown tones age beautifully outdoors, developing a patina that makes the patio look more established and more valuable with every passing year. EP Henry and Belgard both offer brick-style concrete pavers that deliver the classic brick aesthetic with better dimensional consistency and lower installation difficulty than genuine clay brick. Available at Menards and Home Depot nationwide.
Simple DIY Backyard Patio With Wood and Raised Platform
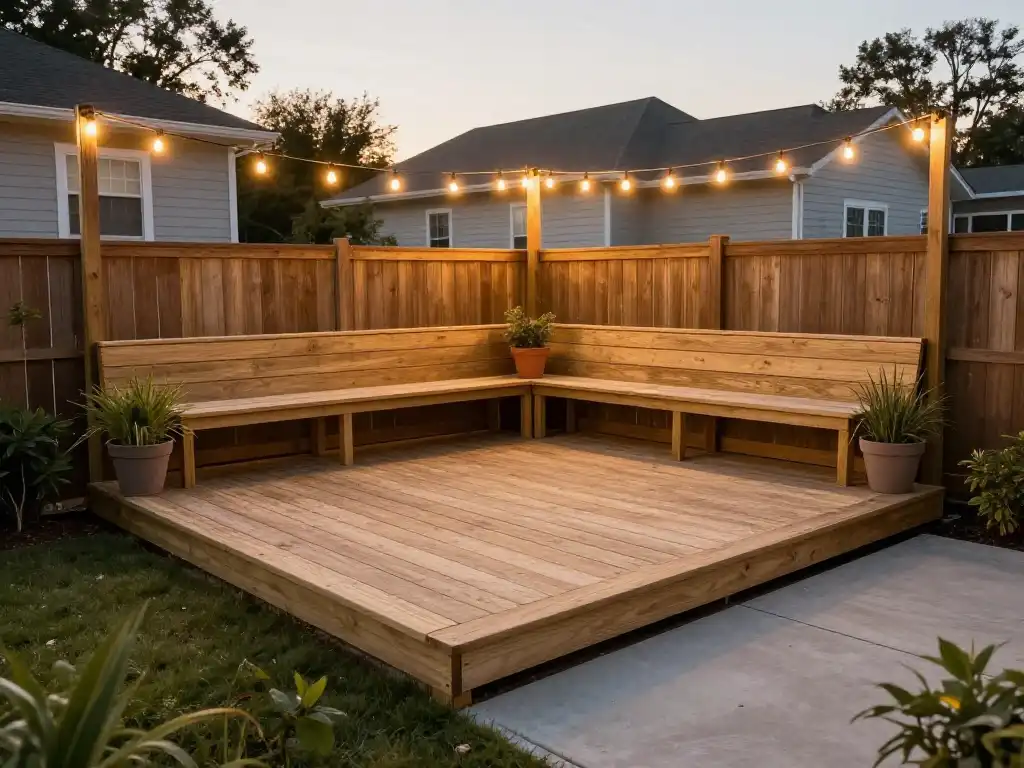
A raised wood platform patio solves the single biggest challenge many American backyards present — uneven or sloping ground. Rather than excavating and leveling a difficult grade, a raised platform simply builds above it on a system of posts and joists that compensates for the slope. Simple DIY backyard patio with raised platform construction suits suburban backyards with significant grade changes, properties with problematic soil drainage, and homeowners who want the warmth and visual character of a wood surface that no stone or concrete alternative delivers.
Simple DIY backyard patio with wood material choice critically determines long-term performance. Pressure-treated lumber rated for ground contact (labeled UC4B) forms the structural posts and joists and resists rot for 15–25 years. For the decking surface itself, composite decking from brands like Trex or TimberTech outperforms natural wood significantly in durability, splinter resistance, and fade resistance — though it costs more upfront. Natural cedar and redwood are both excellent wood decking alternatives at lower initial cost with the understanding that they’ll require periodic sealing or staining every two to three years to maintain their appearance and structural integrity. Simple DIY backyard patio with sand base approaches work for ground-level wood platforms set on concrete deck blocks rather than buried posts — a faster and more accessible build for beginners.
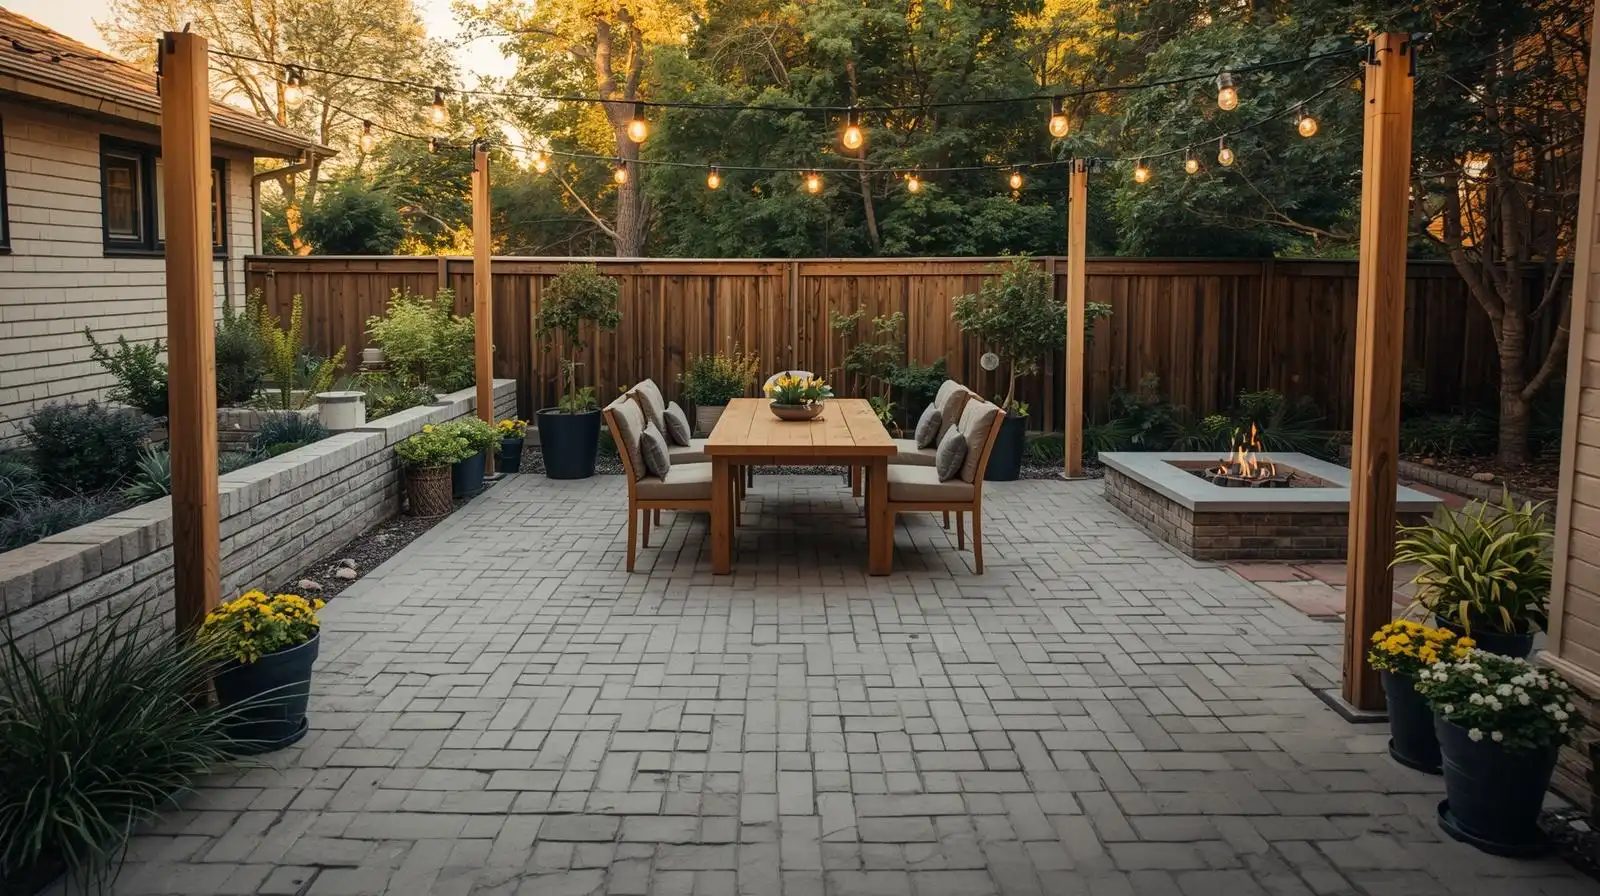
Simple DIY Backyard Patio With Fire Pit and Seating Area
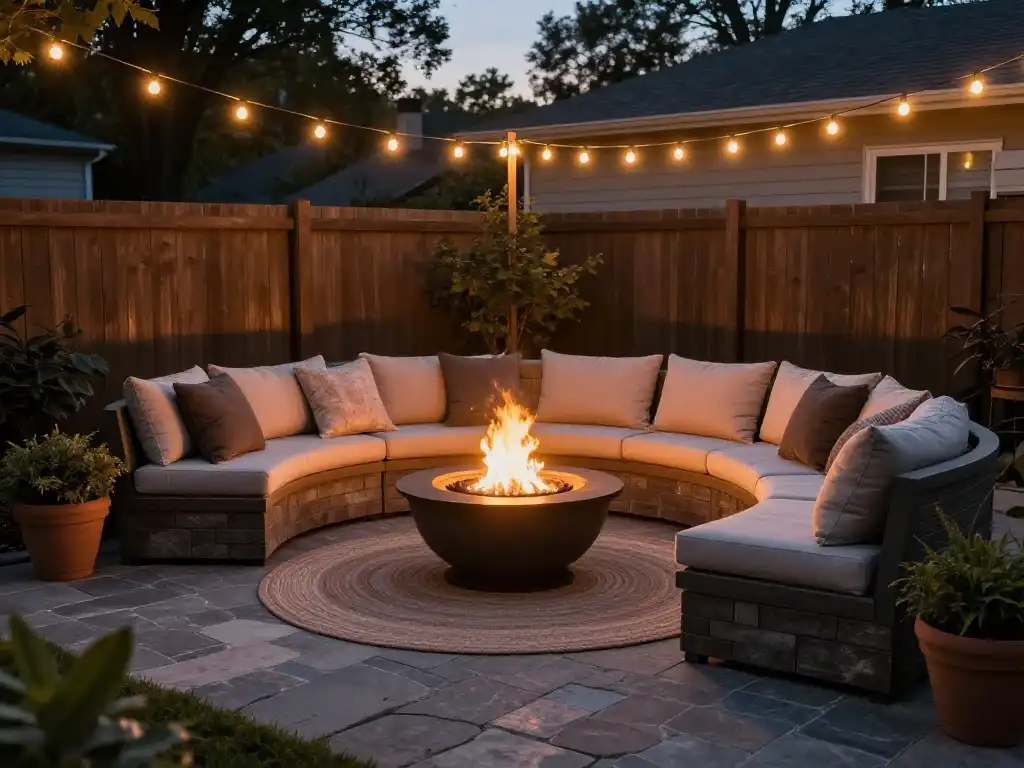
A fire pit transforms a simple outdoor patio into a genuine gathering destination. Simple DIY backyard patio with fire pit design creates a natural focal point around which seating arranges itself instinctively — people gravitate toward fire the way they gravitate toward a fireplace indoors. For a DIY fire pit installation on a paver patio, the most straightforward approach uses a prefabricated steel fire bowl — available from Amazon Home and Walmart outdoor starting around $60 — placed on a dedicated non-combustible pad of fire-rated pavers or flagstone set slightly apart from the main patio surface. This approach requires no masonry skills and produces a clean, functional result in an afternoon.
Simple DIY backyard patio with seating area around a fire pit follows a specific spatial logic. Allow a minimum 7-foot radius of clear non-combustible surface around the fire pit edge before seating begins — this keeps guests comfortable and safe from sparks. Arrange seating in a consistent arc or full circle rather than straight lines — curved seating arrangements feel socially warmer and encourage conversation in a way that linear arrangements never do. Wayfair outdoor and Target outdoor both offer excellent all-weather sectional seating specifically designed for fire pit arrangements. Add outdoor cushions in weather-resistant fabric, an outdoor rug to define the seating zone, and a simple side table between every two chairs for drinks and essentials.
Simple DIY Backyard Patio With Pergola and Shade Structure
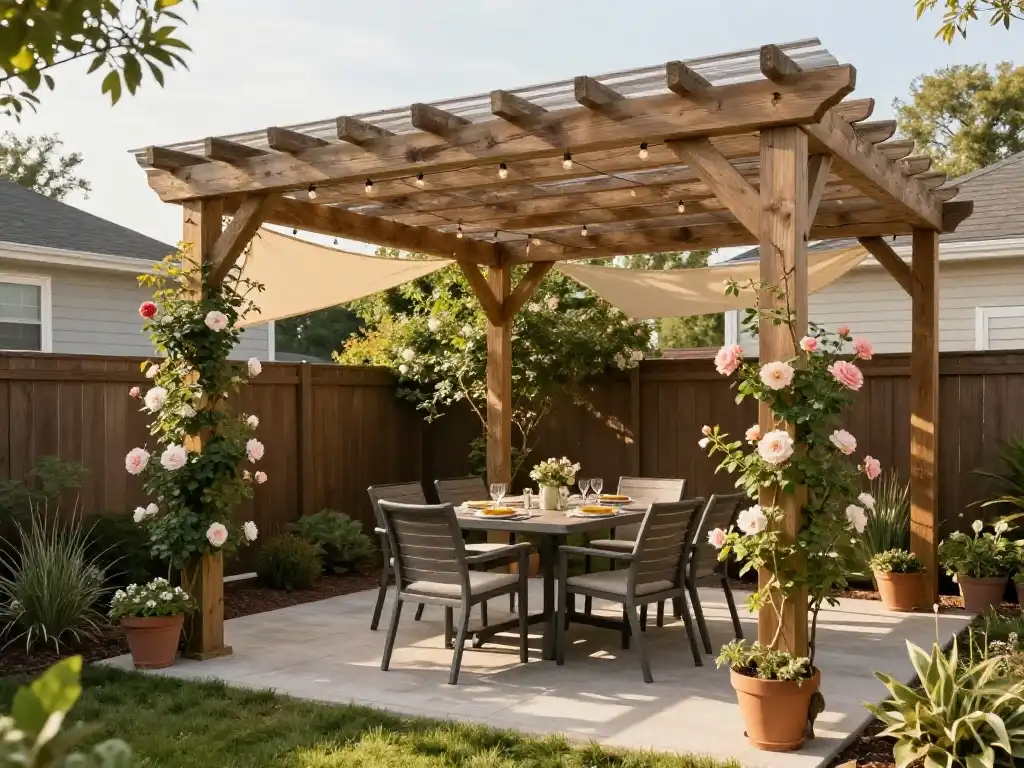
A patio without shade in the American South and Southwest is a patio that goes unused for six months of the year. Simple DIY backyard patio with pergola construction solves the shade problem while simultaneously adding architectural height and visual drama to the outdoor space. A freestanding pergola kit — available from Home Depot and Lowe’s in the $300–$1,500 range — can be assembled in a single weekend with basic tools and delivers immediate structural presence over the patio. The open lattice roof of a standard pergola provides partial shade and creates a framework for climbing plants, hanging string lights, and fabric shade panels.
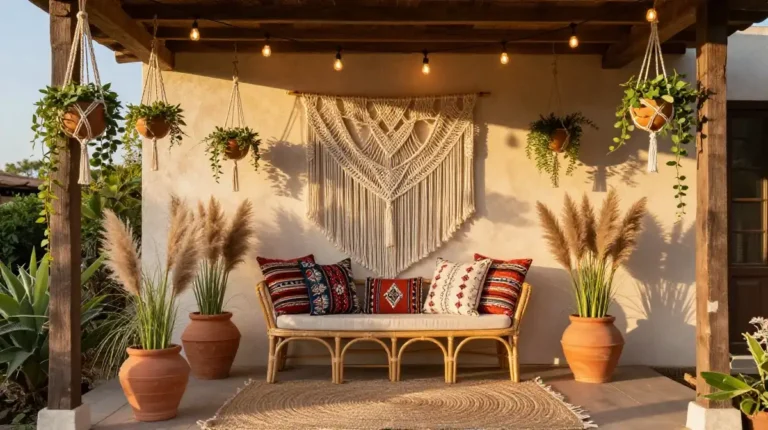
Simple DIY backyard patio with shade structure options beyond the pergola include shade sails — tensioned fabric panels anchored to posts or wall-mounted hooks that provide clean geometric shade in a contemporary aesthetic — and traditional patio umbrellas for smaller seating areas. A shade sail from Amazon Home in a UV-resistant high-density polyethylene fabric installs in a few hours and provides genuinely effective sun protection. Simple DIY backyard patio with privacy screen panels attached to pergola posts add another layer of enclosure — lattice panels, outdoor fabric curtains, or bamboo screen rolls all create a sense of room-like privacy that makes the patio feel like an outdoor room rather than just an outdoor surface.
Simple DIY Backyard Patio With String Lights and Plants
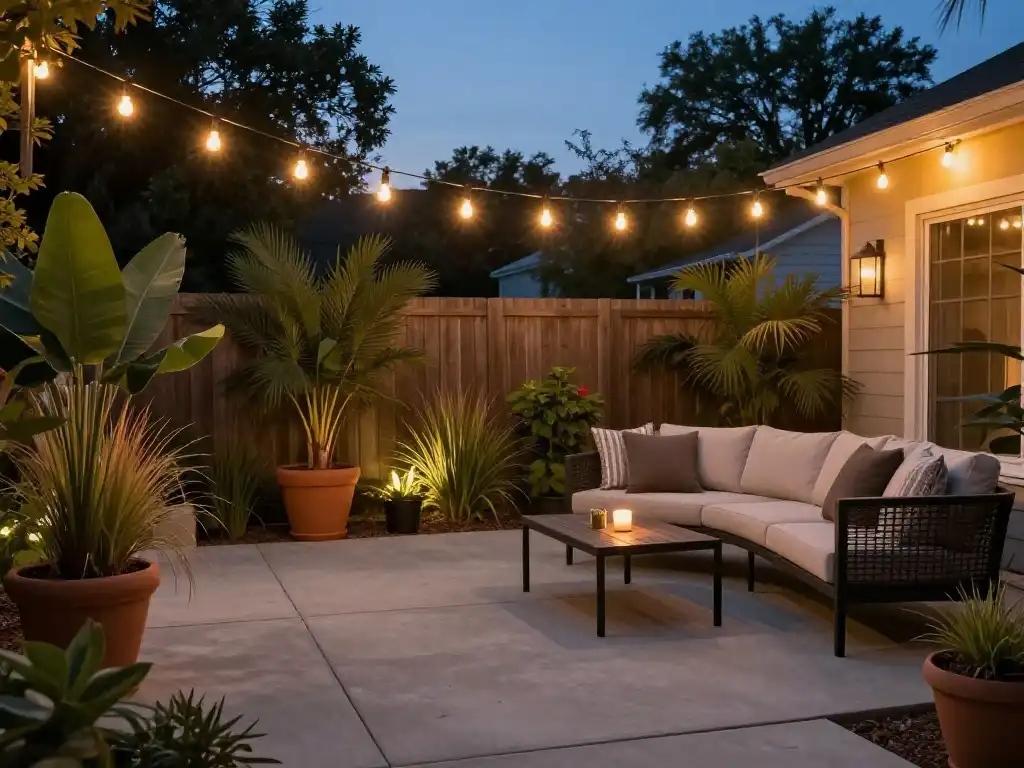
String lights are the single most transformative and most affordable decorative upgrade any outdoor patio can receive. Simple DIY backyard patio with string lights installation turns an ordinary paved surface into something genuinely magical after dark — the warm amber glow of Edison-style bulbs hung in a grid or catenary curve above the patio creates an atmosphere that no other lighting solution replicates at anywhere near the same cost. Install eye hooks into pergola beams, fence posts, or dedicated wooden poles anchored in the patio perimeter and run 48-foot commercial-grade outdoor string lights in a crisscross or parallel pattern overhead. The entire setup costs under $80 and installs in two hours.
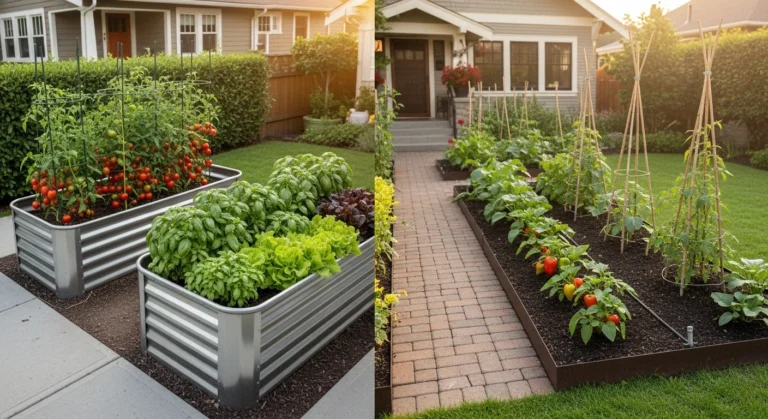
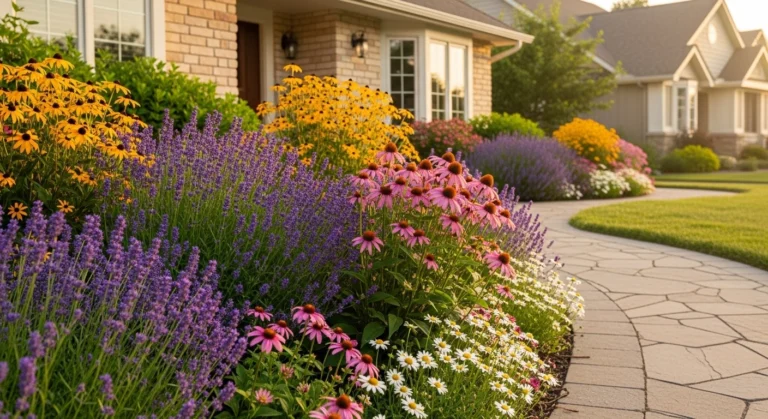
Simple DIY backyard patio with plants completes the transformation from outdoor surface to outdoor room. Potted plants placed strategically around the patio perimeter soften hard material edges and introduce natural color, fragrance, and movement that no inanimate decoration achieves. Simple DIY backyard patio with potted plants should include a mix of heights — tall ornamental grasses or dwarf bamboo in large planters for vertical structure, medium-height flowering perennials for seasonal color, and trailing plants like sweet potato vine or bacopa spilling over planter edges for softness. Simple DIY backyard patio with garden border planting — a narrow bed of lavender, ornamental sage, or ornamental grasses around the patio perimeter — creates the most natural and most beautiful integration between hardscape and landscape.
Simple DIY Backyard Patio for Small Spaces and Renters
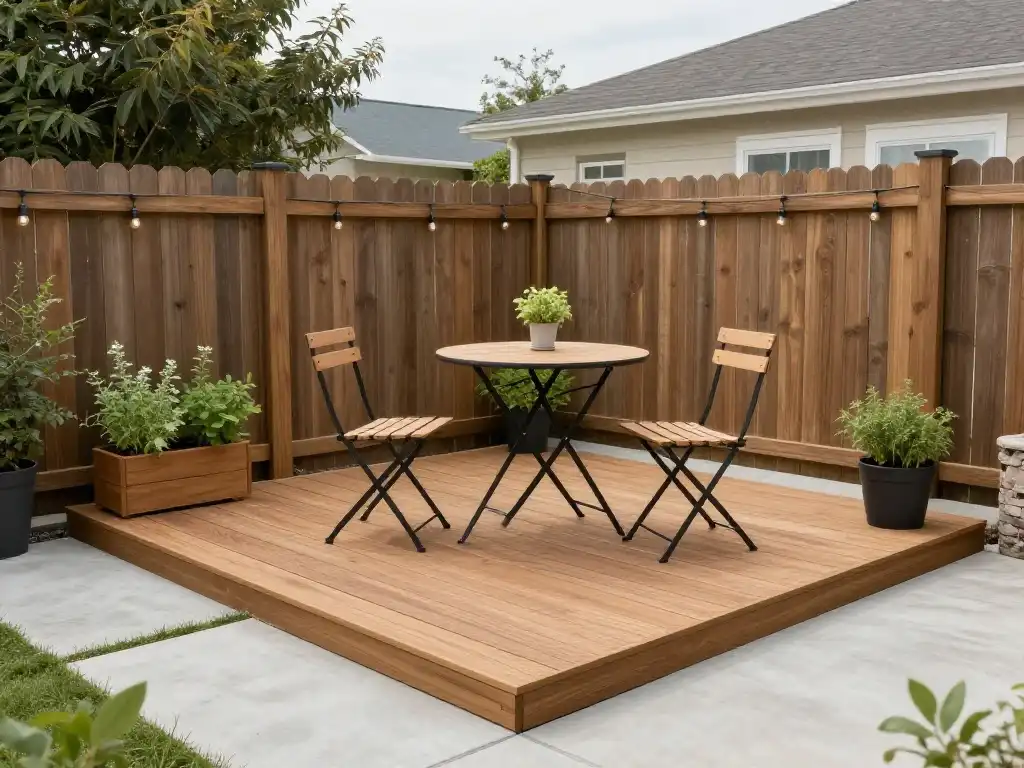
Small backyards and rental properties present unique patio-building challenges — but they don’t prevent great outdoor living. Simple DIY backyard patio small space design prioritizes vertical space over horizontal, multifunctional furniture over single-purpose pieces, and lightweight movable elements over permanently installed structures. A 10-by-10-foot patio in a tight urban backyard can absolutely accommodate a bistro table for two, two comfortable chairs, a small planter, and overhead string lights — that’s a genuinely functional and beautiful outdoor dining space in 100 square feet.
Renters specifically need solutions that install without permanent modification to the property. Simple DIY backyard patio with rubber tiles — interlocking foam or rubber deck tiles that snap together directly over existing concrete, grass, or gravel — create a finished patio surface without any excavation, sand base, or tool use. IKEA outdoor RUNNEN deck tiles and similar products from Wayfair outdoor install in minutes, look clean and designed, and lift completely cleanly at the end of the tenancy. Pair with foldable furniture from Target outdoor or Walmart outdoor that stores easily when not in use and the result is a fully functional simple DIY backyard patio that a renter can take with them when they move.
Simple DIY Backyard Patio Cost Breakdown and Budget Tips
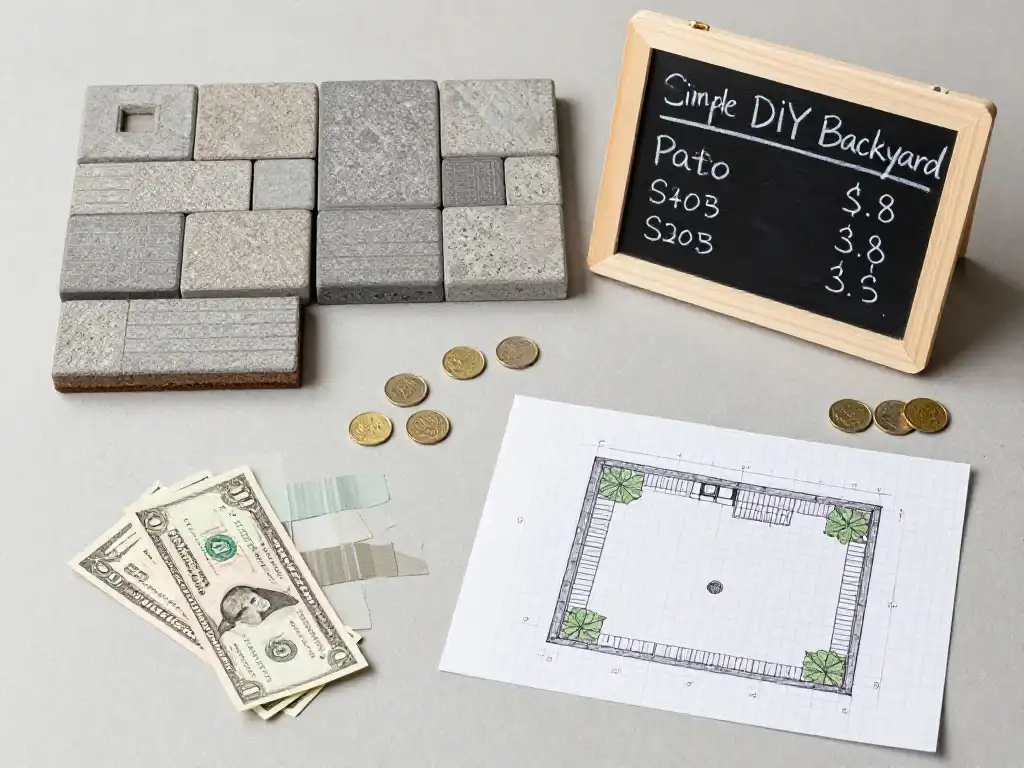
Understanding what a DIY patio actually costs — honestly, without optimistic assumptions — is what separates successful builds from abandoned mid-project disasters. Simple DIY backyard patio cost breakdown for a standard 12-by-14-foot (168 square foot) paver patio on a prepared gravel base typically runs between $400 and $1,200 in materials depending on paver choice and local material pricing. Gravel base material runs $50–$100. Landscape fabric runs $20–$30. Sand bedding runs $30–$60. Concrete pavers at $3–$6 per square foot run $504–$1,008 for the full area. Polymeric sand runs $30–$50. Edging runs $40–$80. Total material cost: roughly $675–$1,300 for a quality finished installation.
Simple DIY backyard patio on a budget can bring that cost down significantly with smart material choices. Gravel or crushed granite patios cost $150–$400 for the same 168-square-foot area. Sourcing pavers from Menards or purchasing overstock lots from local hardscape suppliers frequently yields savings of 20–40% versus retail pricing. Renting a plate compactor rather than buying one saves $200–$400. And doing all excavation by hand rather than hiring a mini-excavator saves another $200–$500. Simple DIY backyard patio weekend project builds completed over two days by a homeowner with basic skills consistently come in at 60–70% below the cost of a professional installation — a saving of $3,000–$8,000 on a project that a hardscape contractor would typically quote at $5,000–$12,000.
| Patio Type | Material Cost (168 sq ft) | Time to Build | Skill Level |
|---|---|---|---|
| Gravel only | $150–$400 | 1 day | Beginner |
| Concrete pavers | $675–$1,300 | 2 days | Beginner–Intermediate |
| Flagstone in gravel | $500–$1,000 | 1–2 days | Beginner |
| Brick pavers | $700–$1,500 | 2 days | Intermediate |
| Raised wood platform | $1,200–$2,500 | 2–3 days | Intermediate |
| Poured concrete | $800–$1,800 | 2 days + cure time | Advanced |
Common Mistakes to Avoid When Building a DIY Backyard Patio
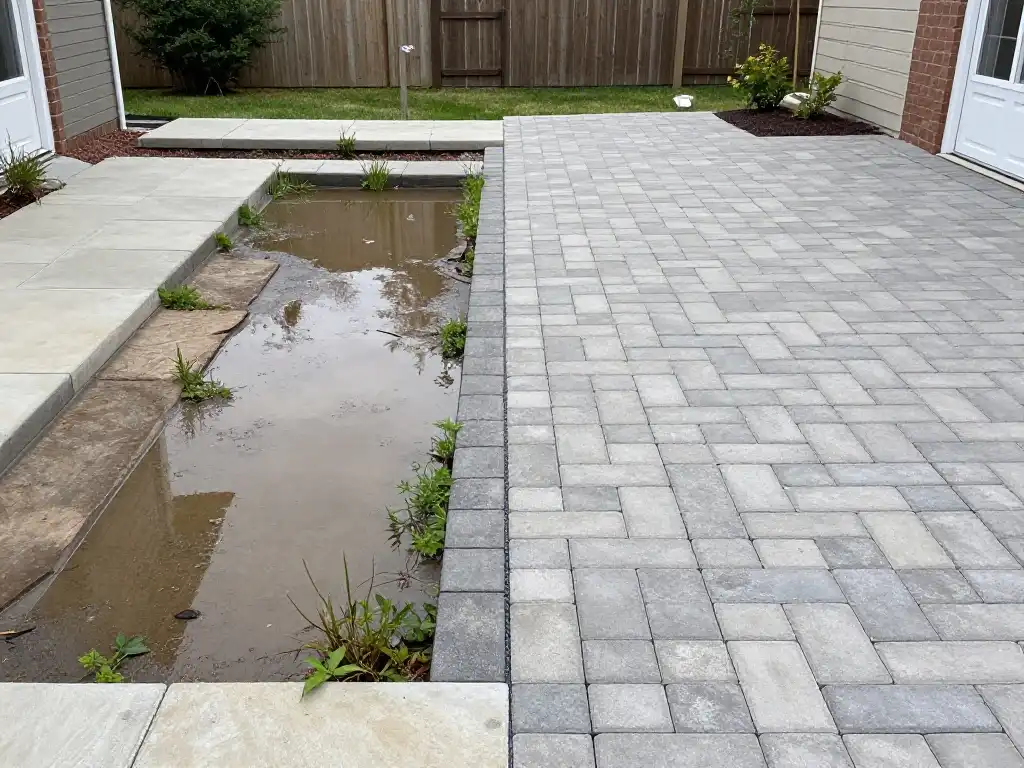
Every DIY patio failure traces back to one of a small number of recurring mistakes — and knowing them in advance is the most valuable preparation any builder can do. Simple DIY backyard patio mistakes to avoid start with inadequate base depth. Skimping on excavation depth to save effort is the leading cause of patio surface failure. Four inches of compacted gravel base is a minimum — not a suggestion. Less than that and pavers sink, shift, and develop the uneven surface that makes a DIY patio look amateurish within the first year.
Ignoring drainage slope is the second most common and most damaging mistake. Simple DIY backyard patio drainage tips emphasize that every outdoor surface needs to shed water — a completely flat patio pools after every rain and pushes that water toward the house foundation where it causes far more expensive problems over time. The third critical mistake is skipping polymeric sand in the joints of paver installations. Regular sand washes out with rain, allows weeds to establish in every joint, and lets ants excavate tunnels that undermine paver stability. Simple DIY backyard patio with sand base work using polymeric sand specifically — not regular play sand or mason’s sand — seals joints permanently and saves years of ongoing maintenance frustration.
Conclusion: Start Building Your Simple DIY Backyard Patio Today
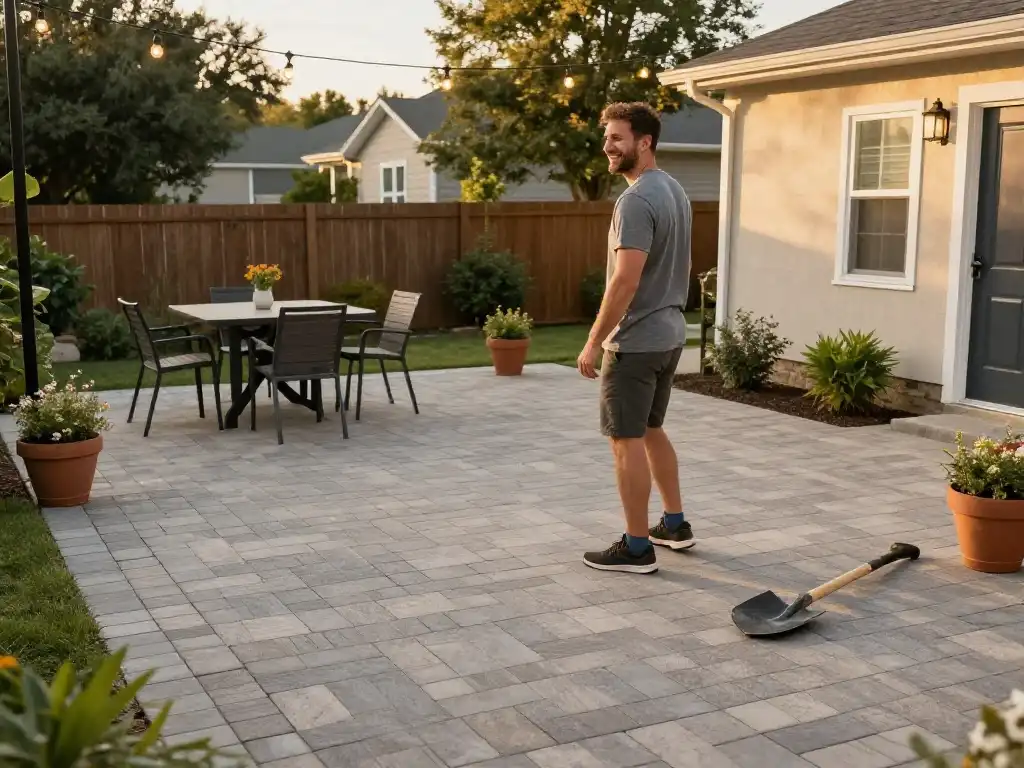
The backyard you’ve been imagining is closer than you think. Not months away. Not a contractor quote away. A weekend away — with the right materials, the right preparation, and the confidence to pick up a shovel and start. A simple DIY backyard patio doesn’t demand perfection. It demands action. The first shovel of dirt you move is the most important design decision you’ll make because everything else — every paver laid, every string light hung, every plant placed — follows from that first committed step.
Start small if you need to. A 10-by-10-foot gravel patio with an outdoor rug and two chairs is a real patio. It’s an outdoor room. It’s somewhere to sit with your morning coffee and feel like your backyard is working for you rather than simply existing behind your house. Build that first. Learn the process. Then expand it next season with more pavers, a pergola, a fire pit, or whatever your outdoor life calls for. The best simple DIY backyard patio isn’t the one on the design blog — it’s the one in your backyard, built by your hands, that you actually use. Go build it.


2 Comments